
Quick answer
To convert a DOCX file to Google Docs, upload it to Google Drive, right-click it, and choose “Open with > Google Docs.” Then go to “File > Save as Google Docs” to create a native copy. You can also turn on “Convert uploads” in Drive settings so every future upload converts automatically.
- Why your DOCX file still shows the .DOCX badge
- Method 1: Open the DOCX directly in Google Docs
- Method 2: Save as Google Docs (the real conversion)
- Method 3: Convert every upload automatically
- Converting a whole folder at once
- What changes after the conversion
- More Google Guides
- Frequently asked questions
You got a .docx file and you want to work on it in Google Docs. The path looks simple, but there is a catch that trips up a lot of people: opening the file in Docs does not convert it. It stays a Word document, with a blue “.DOCX” badge next to the title, and every edit stays locked to the Word format.
This happens all the time. A client emails a contract, you download a proposal, or you need to update an old resume. The file arrives as .docx, Word is not installed, and you would rather work in the browser. Google Docs handles it, but only after a real conversion.
This guide covers the three ways to convert, with screenshots of every step taken straight from Google Drive. The first one gets you reading and editing in seconds. The second creates the native copy. The third makes Drive do the work for you on every upload.
Why your DOCX file still shows the .DOCX badge
When you upload a .docx to Google Drive and open it with Google Docs, Google lets you edit the file but does not convert it. The name keeps a blue .DOCX badge right next to it. That means three things:
- The file is still a Word document, just open inside Google’s editor. The underlying format has not changed.
- Some native Docs features behave differently. Version history, suggestion mode, and a few add-ons depend on the native format.
- Anyone you share it with receives a .docx, not a Google Doc. If they open it in Word, they get the original file back.
To turn it into a real Google Doc, you need one extra step: “Save as Google Docs” or the automatic conversion setting. That is the difference between opening and converting, and it is exactly the confusion that fills the Google support forums.
Method 1: Open the DOCX directly in Google Docs
This is the fastest route. Use it to read, edit, and then decide whether a full conversion is worth it.
Step 1 – Upload the file to Google Drive
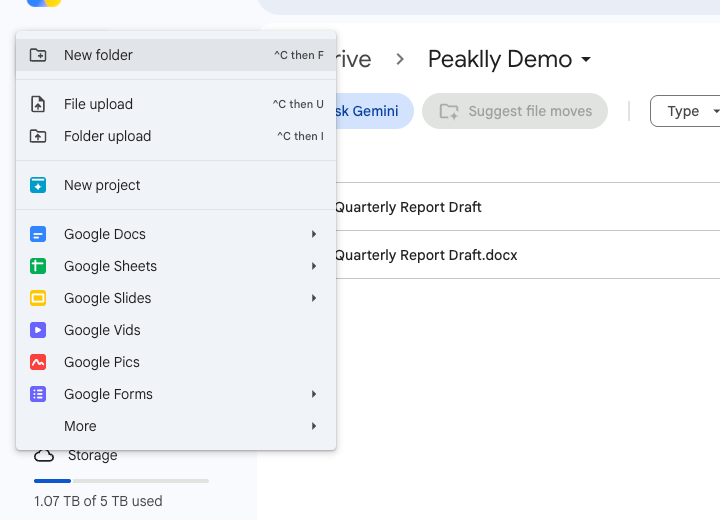
Open drive.google.com, click the “+ New” button in the top left corner, and choose “File upload”. Pick the .docx file on your computer and the upload starts right away.
Step 2 – Find the uploaded file
When the upload finishes, the file shows up in the folder with the blue Word icon and the .docx extension in its name.

Step 3 – Open it with Google Docs
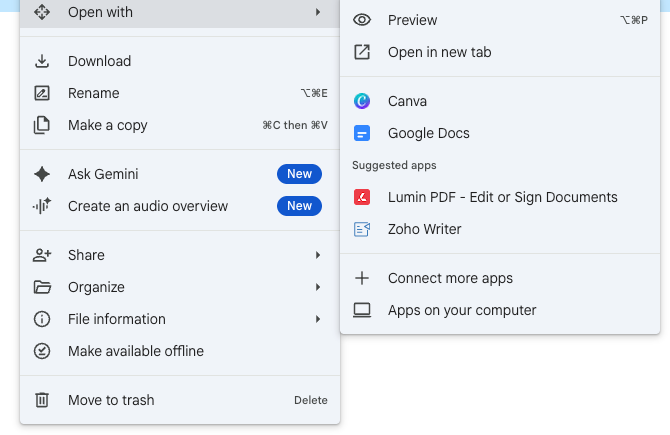
Right-click the file, hover over “Open with”, and click “Google Docs”. A double-click does the same thing, since Docs is the default viewer for Word files.
Step 4 – Check the badge
The document opens in the Google Docs editor and you can edit it immediately. Look at the title: the blue .DOCX badge is still there. The file was opened, not converted.

If all you needed was to read or fix a line, you can stop here. Your changes are saved back into the .docx file. If you want a real Google Doc, move on to method 2.
Method 2: Save as Google Docs (the real conversion)
This is the definitive conversion. It creates a native Google Docs copy with no Word format behind it.
Step 1 – Open the File menu
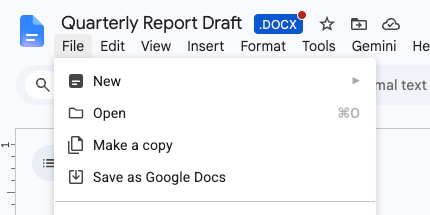
With the document open, click “File” in the menu bar at the top left.
Step 2 – Click “Save as Google Docs”
The option sits near the top of the menu, right under “Make a copy”. Click it.
Step 3 – Confirm the result
Google creates a brand new document and opens it in another tab. Look at the title again: the .DOCX badge is gone. This one is a native Google Doc.

Back in Drive, you now have two files: the original Word document and the converted Google Doc. The icons make the difference obvious, with the blue Docs icon on the native file.

The original .docx stays in your Drive. Delete it later if you want, but check the converted file first.
Method 3: Convert every upload automatically
If you deal with Word files every week, let Drive handle the conversion for you.
- In Google Drive, click the gear icon in the top right corner.
- Choose “Settings”.
- Scroll down to the “Uploads” section.
- Check the box for “Convert uploads to Google Docs editor format”.

The setting saves on its own, no confirmation button needed. From that point on, every .docx you upload lands in Drive already converted. The same rule applies to .xlsx files going into Sheets and .pptx files going into Slides.
One warning: this only affects new uploads. Files already sitting in your Drive stay in Word format until you convert them by hand.
Converting a whole folder at once
Automatic conversion fixes the future, not the past. And Google does not ship a “convert everything” button. The official support answer is blunt: each file has to be opened individually.
If you are staring at a folder full of .docx files, these are your options:
- One at a time with “Save as Google Docs.” It works and it is safe, but it gets old fast past a dozen files.
- A Google Apps Script that loops through the folder and converts each file through the Drive API. It takes a few minutes to set up and then handles hundreds of files unattended.
- A third-party extension. Review the permissions carefully before installing anything that asks for full access to your Drive.
For most people the Apps Script route is the safest way to handle bulk. Google offers no native mass conversion, which is why this question keeps coming back in the support forums year after year.
What changes after the conversion
Basic formatting survives the trip. Bold, italic, headings, bullet lists, and simple tables come through intact. What can shift:
- Fonts that do not exist in Google Docs get swapped for the closest match.
- Complex page breaks and section layouts may reflow.
- Word-specific graphics, like SmartArt and some embedded objects, can break or disappear.
- Macros do not carry over at all. Google Docs has no VBA equivalent.
For a plain text document, a report, or a resume, the conversion is usually clean. For a heavily designed file, open the converted copy and scroll through it before deleting the original.
More Google Guides
If you are moving files between platforms, you may also want to convert Canva to Google Slides for presentations, learn how to make a slideshow in Canva, or check how to do a hanging indent on Canva when you need academic formatting.
Frequently Asked Questions
Usually not. Bold, italic, headings, lists, and simple tables survive the conversion. What can change: fonts that do not exist in Google Docs, complex page breaks, and Word-specific graphics. Macros never carry over. Check the converted copy before deleting the original.
Not through the normal menu. Google converts one file at a time with “Save as Google Docs.” For bulk work, turn on automatic conversion for new uploads, or use a Google Apps Script to loop through a folder that is already in Drive.
No. “Save as Google Docs” creates a new file and leaves the original .docx untouched in the same folder. You decide whether to delete it afterwards.
Because opening is not converting. Google Docs lets you edit Word files in place, so the document keeps its original format until you run “Save as Google Docs” or enable automatic conversion in Drive settings.
Yes, with a different path. In the Google Drive app, tap the three dots next to the .docx file and choose “Open with > Google Docs.” The “Save as Google Docs” option lives in the three-dot menu inside the editor.
No. The “Convert uploads” setting only affects files uploaded after you turn it on. Anything already stored stays in Word format until you convert it manually or with a script.